Tuesday, October 1, 2013

Super Simple Peach Crumble

After 1 week of fall-like weather, it is back to mid-80 temperatures in Virginia. This warmth has me thinking less about Autumn’s apples and pears, and more about Summer’s berries and peaches. Remember those amazing peaches I mentioned from the market back in August? One of the sweet treats I made with the peaches was a crumble that about as easy as it gets.

Peaches were terrific in it. Since the dessert is based off of a recipe that originally called for nectarines, though, I imagine it would be tasty with about any stone fruit you prefer. Also, although I made it in a single dish, it certainly would be cute baked in separate ramekins or individual mini cast iron pans.

Serves 2-4

Ingredients:
3 peaches, pitted and thinly sliced
3 Tbsp granulated sugar
juice of half a lemon, freshly squeezed
pinch salt

6 Tbsp all-purpose flour
2 Tbsp dark brown sugar
1 Tbsp wheat germ
2 Tbsp unsalted butter, softened

Instructions:
Preheat oven to 375 degrees.

Toss peaches with granulated sugar, lemon juice, and salt. Let stand for at least 15 minutes (but no more than 1 hour).

In another bowl, mix together flour, brown sugar, wheat germ, and butter with your fingers to form a crumbly mixture.

In a cast iron pan (or baking dish as a substitute), pour the peach mixture with its liquid. Bake for 5 minutes.

After 5 minutes, top the peaches with the crumbs and bake for another 15 minutes or until the fruit is soft and bubbly and the streusel is golden brown. Serve topped with vanilla ice cream.


[Recipe adapted from Nectarine-Thyme Crumble, Food & Wine Magazine, July 2013: http://www.foodandwine.com/recipes/nectarine-thyme-crumble]

Wednesday, September 11, 2013

Herbed Orzo and Chicken Salad

This was a really nice salad, great for a weeknight dinner. It serves 6, easily, which means that there is plenty for last minute company or to pack for lunches the next day.

Salad:
about 1 pound boneless, skinless chicken breasts
canola oil
salt and pepper
1 cup orzo
1 15oz can chickpeas, drained and rinsed
1 cup cherry tomatoes, halved
1 bunch green onions, white and light green parts sliced thinly
¼ cup chopped curly parsley
leaves from about 5 thyme sprigs
6oz crumbled feta cheese

Vinaigrette:
juice from 2 small lemons
roasted garlic oil, to taste
kosher salt
fresh cracked pepper
(adjust as necessary to have about ¼ cup of vinaigrette)


Preheat oven to 350 degrees. Rub chicken breast lightly with canola oil and sprinkle both sides with salt and pepper. Bake in a casserole dish for 30min or until cooked through. Set aside.

Boil water and then cook the orzo until tender. While orzo is cooking, mix green onions and tomatoes in a large bowl with chickpeas. Add herbs and feta. Dice baked chicken and add to bowl.

Drain pasta. While pasta is cooling slightly, mix together vinaigrette ingredients and season to taste. Add orzo to bowl. Drizzle vinaigrette over top and toss salad.

Serve warm or chilled. Salad is nice over a bed of arugula or baby lettuces.


[Recipe adapted from Orzo Salad with Chickpeas, Dill, and Lemon, Cooking Light, August 2002: http://www.myrecipes.com/recipe/orzo-salad-with-chickpeas-dill-lemon-10000000338370/]

Tuesday, August 27, 2013

Snacks at the Market

The past few weeks have been wonderful at the farmers’ market. Although I have been finding tasty items all summer, within just the past couple of weeks the colors really exploded, a feast for the eyes even before the palate. Plus, I discovered that one of the vendors had freestone peaches. As opposed to clingstone peaches, I find freestone to be so much friendlier to eat, and luckily, they tasted amazing too.

Because of how beautiful the bounty has been, you just had to see it.

Last week, it was: sweet corn, freestone peaches, green beans, sweet potatoes, leeks, cantaloupe, heirloom and Roma tomatoes, and these fun little sweet snack peppers that I got because they were to brilliantly colored and cheery to pass up.

This week, I found: cantaloupe, peaches, butternut squash, onions, Asian pears, green beans, eggplant, Pattypan squash.

I also noticed once again that another lovely thing about the farmers’ market is that the walk to and from the market from our neighborhood on Saturday mornings is quite possibly the friendliest spot in northern Virginia. Other mornings it may be a commuter’s hurried trek to the rail station, but on Saturday mornings, people stroll leisurely along the paths. Just about everyone smiles at one another in passing. They say, “good morning” or “how are you” as you cross paths. This exchange of greetings that does not often happen between strangers in this area at other times and places. It is not lost on me that these encounters happen in the morning sunlight, under a canopy of trees alive with songbirds and over the prospect of fresh food.

Wednesday, July 31, 2013

Bourbon-Fig Spread

Last Wednesday I participated in a cooking contest at Chris’ office. Some of his colleagues decided that there should be a fun monthly contest from July until the end of the year that would test out the cooking skills of the office mates and their significant others. This month’s theme was “Dips and Spreads.” I decided to make a bourbon-fig spread. For serving, I sent along Brie cheese and rosemary crackers, although I think that Stilton cheese would probably be equally tasty for next time. The batch makes enough to fill one, 16oz Ball jar.

Ingredients:
4 Tbsp unsalted butter
½ tsp kosher salt
½ cup dark brown sugar, packed
¾ cup Kentucky bourbon
1 Tbsp ground cinnamon
1 tsp ground nutmeg
1 tsp ground ginger
7oz bag of dried Mission figs, diced
¼ cup dried cranberries*
½ tsp double-strength vanilla extract
juice of 1 lemon, divided
pinch sea salt
¼ cup honey (or more to taste)
¼ cup water
4 ½ tsp fruit pectin (such as SureJell)
Brie or Stilton cheese, for serving
Crackers or bread, for serving

Instructions:
In a non-stick saucepan, melt butter, sugar, and bourbon over low to medium low heat. Add cinnamon, nutmeg, and ginger and mix well.

Add figs, cranberries, vanilla, juice of ½ lemon, and sea salt. Steep mixture over low heat for about 20-30 minutes. The fruit should soften some and the aromas should begin to meld.

Move entire mixture from the saucepan to a food processor or blender, and process until it is the consistency of a preserve. Scoop back into the saucepan and back over low heat. Add honey, the juice from the other lemon half, and water and stir well to incorporate. Add more honey and /or water to adjust for taste.

Sprinkle the pectin over the mixture and stir well. Turn heat to medium. Cook spread until bubbly, about 5 minutes. Remove from heat and let cool. Serve with cheese and crackers.

*You can substitute other dried fruit as desired. In total, you should end up with about 2 cups of fruit.
[Recipe adapted from Jean’s Kentucky Bourbon Fig Compote, Panera Featured Member:
http://mypanera.panerabread.com/recipes/recipe/kentucky-bourbon-fig-compote/
]

Sunday, July 21, 2013

Fried Green Tomatoes

Warning! This recipe is not for anyone afraid of butter. You have to drench these in butter. It’s okay. It’s worth it.

I wait for the time every summer where the green tomatoes roll into the farmers market. Mom gave me my love of fried green tomatoes. There are other ways to eat green tomatoes: relish, salsa, in an heirloom tomato salad, pickled. But really, why worry about those other ways when you can have them fried? Restaurants usually serve them deep-fried, and use eggs, buttermilk, and cornmeal. But mom and I have a simpler and quicker flour and butter version. It satisfies my annual craving just as well.

Serves 1

1 small-medium green tomato, sliced about 1/4in thick
around 2 Tbsp butter, plus more to butter 1 of the bread slices
½ cup skim milk
½ cup flour
kosher salt
freshly ground pepper
2 slices sandwich bread, white or wheat (“squishy bread” tastes the best – this is one time where you save the fancy bread for other things)

Butter 1 slice of bread and lay open on a plate. In an 8inch skillet*, melt the butter over medium to medium high heat so that you have a thin bubbly layer. Dredge the tomato slices in flour, dip them in milk, and then dredge again in flour.

Lay the slices in the hot melted butter and fry until the slices are crispy and brown on the bottom. Flip over and fry the other side until it is also crispy and brown, and the tomatoes are slightly softened.

Arrange on the buttered slice of bread. Sprinkle with salt and grind a bit of fresh pepper over top. Complete the sandwich with the other slice of bread, cut in half, serve, and enjoy. Blow on your first bite though – it will be hot!


*Note: if your tomato is large, you might need a bigger skillet. If you need a bigger skillet, you might need more butter.

Monday, May 27, 2013

Memorial Day Weekend and Barbecue Pulled Pork

Although the clouds took over this afternoon, the morning was gorgeous and sunny, with a perfect temperature. I took advantage of it by walking up to the grocery store for the few ingredients I needed to put together my dinner plans. This holiday weekend has been pretty full: coffee and baking projects with a friend, a birthday celebration, and a get-together at a DC biergarten that lasted well into Sunday night. A start-it-and-forget-it barbecue pulled pork seemed like a great way to wrap it up. The recipe I tried was featured last week in “the Dish” newsletter from Food & Wine, and I had bookmarked it for the occasion.

Slow-cooked Barbecue Pulled Pork and Coleslaw

Pulled pork:
1 small yellow onion, finely chopped
1 cup organic ketchup
¼ cup brown sugar
3 Tbsp cider vinegar
2 Tbsp molasses
1 Tbsp Dijon mustard
2 tsp sambal oelek
2 ½ pounds boneless pork shoulder or Boston butt, cut in quarters
Whole wheat buns

Coleslaw:
½ cup mayonnaise
½ cup plain yogurt
2 Tbsp fresh squeezed lemon juice
1 tsp ground mustard
kosher salt
pepper
shredded cabbage and carrots

For the pulled pork, whisk together all ingredients from the yellow onion through the sambal oelek. Place the pork in a slow cooker and slather with barbecue sauce mixture. Cook on high for around 6 hours, until the pork is very tender. 

While the pork is cooking, mix all of the ingredients for the coleslaw except for the cabbage and carrots. Once well incorporated, add in the cabbage and carrots and toss to coat. Refrigerate until serving time.

Once the pork is done, remove it from the slow cooker and shred. Pour the barbecue sauce into a saucepan and boil on high heat until it has reduced and thickened. Pour over the pulled pork and toss.

Mound a scoop of pulled pork onto the whole wheat bun, top with some coleslaw, and if desired, serve with baked beans.

[Recipe adapted from Food & Wine, September 2008, as found on foodandwine.com: http://www.foodandwine.com/recipes/slow-cooker-barbecued-pulled-pork]

Monday, April 15, 2013

2013 Cherry Blossom Festival, Downtown DC


The Cherry Blossom Festival is an annual spring event in Washington, D.C. It commemorates the 3,000 cherry trees that were given to the city of Washington in 1912 by Tokyo’s Mayor Yukio Ozaki, as well as symbolizes an ongoing relationship between Japan and the United States. 

The National Park Service gives a nice description of the cherry tree varieties. The Yoshino and Kwanzan cherry trees are now the most dominant varieties from the 12 original types gifted in 1912. The Yoshino cherry trees are seen around the Tidal Basin and near the Washington Monument, while the Kwanzan may be found mostly in East Potomac Park. The cherry trees range in color from soft white to bubble gum pink to deep rosy blush. The festival highlights the trees blossoming, of course, but for those interested also has a calendar full of events lasting several weeks. Activities range from a parade and fireworks to a Japanese Street Festival and sake tastings, and you can find them all at www.nationalcherryblossomfestival.org.

Tourists flock to the National Mall, the Tidal Basin, and surrounding areas of downtown Washington, D.C. to see these flowery trees in bloom. According to the festival website, 1.5 million tourists, in fact, travel to the Cherry Blossom Festival each year.

There are always plenty of articles about the top tips for visiting and photographing the cherry blossoms, and I often agree with them: go at dusk or dawn, wander at different times of the day to catch varied light, plan an agenda to take in some of the festival events, etc.

But local residents also like to venture down to help usher in spring. You might be able to swing a visit at any time, as well as get to the special events. However, I am realistic enough to recognize that, particularly for locals (and especially locals living outside the beltway), you may have to work, run errands, fight beltway traffic, or keep pace with any multitude of daily activities that impede with your ability to get to the Cherry Blossom Festival at those optimal times.

That’s exactly why I ended up gazing at cherry blossoms in the middle of a gorgeous Sunday afternoon right smack in the middle of gobs of people. In other words, great weather + weekend + mid-day = extra crowded. Add to that, the trees hadn’t even peaked yet, which meant everyone was vying for camera space under the same trees, finding the one tree every hundred some feet that had already opened up. But you know what? It was still fun! It was fun because I’ve learned some “any-time tips” for cherry blossoming and think they’re worth it. Happy snapshot-ing!

My any-time tips for enjoying the cherry blossoms:
  1. Be patient. There will be crowds, there will be people stopping in the middle of your path, there will be traffic police blowing shrill whistles in your ears, and area restaurants will have long waits. If you haven’t exercised patience in the past, now is the time to start.
  2. If you plan to get off at an alternate metro stop, such as Farragut or Arlington Cemetery, and walk a ways, it can be much more pleasant than battling crowds at the Smithsonian stop.
  3. Embrace the photo-bombers. It is highly likely that you’ll get a few heads in your photos. With a little patience (yes, sorry, the patience word again), you can slide in for unimpeded views and close-up petals. On the other hand, rather than detract, the human experience can just as easily add to the story.
  4. Don’t fall in the Tidal Basin. Okay, this one is just a suggestion, but since the Tidal Basin walkway might be the only place in all of the U.S. where there is a drop-off and no guardrail, it seems like a good reminder. And the water is probably cold.
  5. Get off the beaten path a bit for food, find a place that takes reservations, and try to eat at slightly off times. We got reservations for a table in the street-facing room of Annie’s in the Dupont area (a few blocks and a really short cab ride) north of the National Mall; there we enjoyed our window seats and people-watching over burgers, sandwiches, and giant salads alongside a fried calamari appetizer and drinks like a pomegranate mimosa and blueberry lemonade.
  6. Finally, brush up on your monuments and memorials identification skills. This is a great chance for you to not only see the beautiful cherry blossoms but also all of the nearby DC sites. It’s okay if you don’t know all of the history; there are plenty of placards to help you increase your knowledge. However, it’s probably good not to be the (clearly American) person I overheard saying, “we’re over by the big pencil-looking thing.” That pencil-looking thing, folks, would be the Washington Monument….


Tuesday, April 2, 2013

Warm Cauliflower-Barley Salad


This is a pleasant and filling salad. It is perfect for a weeknight, too, because of its simplicity. Serve with fresh fruit or fruit salad for bright companion of flavors. You can also scoop the salad on top of a bed of baby spinach or arugula if desired.

Makes 4 servings or 6 small servings

Ingredients:
½ cup pearled barley
Kosher salt
fresh ground pepper
zest from 1 small lemon
2 Tbsp fresh-squeezed lemon juice
1 Tbsp mayonnaise
1 tsp whole-grain mustard
5 Tbsp olive oil
1 head cauliflower, cut into florets
1 15-oz can of black-eyed peas, drained and rinsed
¼ cup flat-leaf parsley, chopped

Instructions:
Put barley in a medium saucepan. Cover with water by at least 2”. Season with salt and bring to a boil. Boil uncovered until tender, around 30 minutes.

Meanwhile, heat 1 Tbsp olive oil in a large skillet over medium heat. Add cauliflower and sauté, stirring occasionally, about 10 minutes or until browned in spots. Transfer to a large bowl. Then add the black-eyed peas to the skillet and cook until warm. Add beans to the large bowl with the cauliflower. Stir in parsley and lemon zest.

In a separate bowl or measuring cup, whisk together lemon juice, mayonnaise, mustard, and the remaining 4 Tbsp olive oil until blended. Season with salt and pepper. Set aside briefly.

When the barley is ready, drain. Then mix with the black-eyed pea/cauliflower mixture. Drizzle over dressing and stir until well mixed. Garnish with additional pepper and sprinkle of parsley if desired.

Recipe adapted from Bon Appétit, The Bon Appétit Test Kitchen, March 2013, as found on Epicurious: http://tinyurl.com/c6me23s]

Saturday, March 30, 2013

Easter Luncheon Cupcakes: Lemon Angel Food


These cupcakes are bright and citrusy, which makes them a perfect finish for a Springtime or Easter luncheon. They have a zesty tang of lemon, the fluff of angel food cake, but plenty of sugar to satisfy your sweet tooth. Make them even cuter with some themed muffin cups. Wilton’s pink petal muffin cups are really cute for this recipe: http://tinyurl.com/3gvvord. Then add some decoration. The original recipe suggested edible flowers, which I thought would be so pretty except they were out of them at the store. I had to opt for some multi-colored nonpareils instead.


For batter:
½ cup cake flour
¾ cup powdered sugar
about ½ cup egg whites
1/8 tsp salt
¾ tsp cream of tartar
½ cup granulated sugar
¼ tsp double-strength vanilla extract
grated rind from 1 small lemon
For frosting:
¼ cup softened butter
2 cups powdered sugar
1 Tbsp 1% milk
2 Tbsp fresh-squeezed lemon juice, plus more if desired
decorations like colored sprinkles

Prepare your muffin/cupcake pan; plan on getting anywhere between 16-18 cupcakes. Measure out the cake flour carefully by lightly spooning into measuring cups – don’t pack down. Then sift the flour together with the powdered sugar a total of 3 times. This will help keep the cupcakes fluffy. Set aside.

Preheat oven to 350 degrees.

Preferably using a stand mixer fitted with a whisk attachment, beat the egg whites and salt together until frothy. Add the cream of tartar and beat at medium speed until the mixture forms soft peaks. While the mixer is running, slowly add 1 Tbsp of granulated sugar at a time until all has been added. Continue beating until stiff peaks can be formed. Remove mixing bowl. Adding ¼ cup of the dry ingredients at a time, add in the flour mixture and fold after each addition. Finally, fold in the vanilla and lemon rind.

Spoon batter evenly into muffin cups. Bake at 350 degrees for 16-18min or until the tops are lightly brown. Remove cups from pan and cool on a wire rack. (They will sink down slightly upon cooling.) Repeat baking process with any remaining batter.

While the cupcakes are cooling, make your frosting. Again using a stand mixer if possible, beat butter until fluffy. Gradually add the powdered sugar and beat at low speed until blended. Add milk and lemon juice and beat until smooth. Beat in extra lemon juice as desired for consistency and taste of the frosting.

Spread a little dollop of frosting atop each cupcake and decorate. (You’ll likely have some extra frosting – I would suggest refrigerating it for later use as a treat with sugar cookies or graham crackers.)

Recipe adapted from Greg Patent’s Lemon Angel Food Cupcakes, Cooking Light, May 2006

Tuesday, March 12, 2013

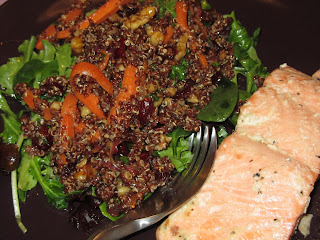
Food & Wine's Roasted Carrot and Red Quinoa Salad


This was a fabulous quinoa salad recipe from Food & Wine that I tried after reading their October 2012 issue. As usual, I adapted it to what I had in the pantry and preferred at the grocery store. I served it with lemon pepper-marinated salmon.

Ingredients:
2 tsp Hungarian paprika (sweet paprika)
1 tsp ground cumin
1 tsp ground ginger
1 tsp ground coriander
1 tsp ground cinnamon
¼ tsp cayenne pepper
¼ tsp ground cardamom
salt
freshly ground pepper
4 large carrots, cut in half and then thinly sliced lengthwise
1 small red onion, thinly sliced
7 Tbsp extra-virgin olive oil
½ cup chopped walnuts
1 cup red quinoa
2 cups water
2 Tbsp lemon juice
2 large handfuls mixed baby salad greens
1 tsp whole-grain mustard
½ cup dried cranberries
2 Tbsp chopped curly parsley

Instructions:
Preheat the oven to 400 degrees. Spread the walnuts on a nonstick rimmed cookie sheet. Bake for about 7 minutes until lightly toasted. Pour in a bowl and set aside to cool.

Throughly mix the paprika, cumin, ginger, coriander, cinnamon, cayenne, and cardamom. Season with salt and pepper. Cut up the carrot and onion. Toss with 2 Tbsp of olive oil. Add in 1 Tbsp of the spice mixture and stir to coat. Spread the carrot and onion mix onto the baking sheet. Roast 20-30 minutes, stirring occasionally, until tender.

In a medium saucepan, combine the quinoa with 2 tsp of spice mix and the water. Bring to a boil. Cover and simmer over low heat until the water is absorbed and the quinoa is tender. This should take around 20-25 minutes. Once water is absorbed, uncover, fluff and let cool slightly.

Mix together 2 Tbsp oil and 1 Tbsp lemon juice. Season with salt and pepper. Toss in the salad greens and mix until coated. Place the salad greens on a serving platter. In the same bowl, add the remaining 3 Tbsp of oil and 1 Tbsp lemon juice, plus the mustard and 1 tsp of the spices. Season again with salt, and pepper if desired. Add the quinoa, walnuts, cranberries, curly parsley, and the roasted vegetables. Spoon over the salad greens and serve.

[Adapted from Food & Wine Magazine, October 2012 issue - http://www.foodandwine.com/recipes/roasted-carrot-and-red-quinoa-salad]

Thursday, February 28, 2013

Crunchy Sausage Casserole


This is a really tasty casserole. I was given the recipe by my mom, from a collection of recipes she and a friend put together years ago for another friend, a woman with triplets, little time, and a budget. You can follow this method to make it the night before or, if you have enough time, it can be made the same day and it will be just fine to cook without having to refrigerate first.

1 package long grain & wild rice mix
1 pound bulk pork sausage
1 pound ground beef
1 onion, chopped
1 can mushrooms, drained
1 can sliced water chestnuts, drained
2 Tbsp soy sauce
1 (2.75 oz) package sliced almonds

Cook rice according to package directions; set aside.

Cook sausage, ground beef, and onion over medium heat in a large skillet until meat is brown. Drain. Add rice, mushrooms, water chestnuts and soy sauce. Stir well. Spoon into ungreased 2-qt casserole dish. Cover and refrigerate overnight. Remove from refrigerator and sprinkle with almonds. Place in cold oven and turn on to 325 degrees. Bake 1 hour or until thoroughly heated.

Thursday, February 14, 2013

Valentine’s Day Carrot Cake


This recipe is adapted from the Best Carrot Cake recipe on www.myrecipes.com. They make it as a layer cake, but I had seen a single layer cake that was shaped to look like a heart, and thought this would be the perfect recipe with which to try it. Next time I might leave off the buttermilk glaze completely, because it is really sweet. It was a huge hit with my husband, though, so it was indeed an excellent choice for Valentine’s Day.

Cake:
2 cups flour
2 tsp baking soda
½ tsp salt
2 tsp ground cinnamon
3 large eggs
2 cups sugar
¾ cup vegetable oil
¾ cup buttermilk
1 tsp double-strength vanilla extract
2 cups carrots, shredded
8 oz can crushed pineapple
3.5 oz sweetened fresh coconut
1 cup chopped walnuts

Line 1 round cake pan and 1 square cake pan with parchment paper, lightly greased and floured.

Preheat oven to 350 degrees. Mix flour, baking soda, salt, and cinnamon. In a stand mixer (or with hand mixer), beat together eggs, sugar, vegetable oil, buttermilk, and vanilla. Slowly add flour mixture and beat at low speed until well blended. Stir in shredded carrot, pineapple, coconut, and walnuts.

Divide batter between prepared pans. Bake for about 35 minutes or until a wooden toothpick comes out clean when inserted into the center. Once cakes are done, remove them from oven and drizzle the buttermilk glaze (see below) until both cakes are lightly covered. Cool the cakes in their pans on wire racks for about 15 minutes. Remove from pans onto wire racks and cool completely.

Arrange square cake on a serving platter diagonally. Cut the round cake in half. Arrange 1 half along the top left diagonal edge of the square cake. Arrange the other half on the top right diagonal edge of the square cake. Once arranged, the cake should resemble a heart shape (in 3 pieces). Spread the entire cake with cream cheese frosting (see below).

Buttermilk Glaze
1 cup sugar
1 ½ tsp baking soda
½ cup buttermilk
½ cup unsalted butter
1 Tbsp light corn syrup
½ tsp double-strength vanilla extract

Combine all ingredients except for vanilla extract in a medium pan over medium-high heat. Bring to a boil and boil, stirring constantly, until well incorporated. Remove from heat and add the vanilla.

Cream Cheese Frosting:
½ cup unsalted butter, softened
8 oz cream cheese, softened
16 oz powdered sugar
¼ tsp double-strength vanilla extract
Red food coloring

Beat together butter and cream cheese until creamy. Add powdered sugar slowly, blending at low speed. Add vanilla. Drop 1-3 drops food coloring to make the frosting pink (for Valentine’s Day, of course!) or more for redder frosting.